Forget NES Classic... Build Your Own Raspberry Pi Retro Gaming Console

When I first heard about Nintendo releasing a mini version of the NES, I was stoked! Like everyone else, I couldn't wait till I could get my hands on one. We all know what happened when the release date arrived... Nintendo didn't produce enough of them and the demand was sky-high. They were sold out everywhere and selling online for way over the sticker price. Even at the time of this writing -- several months after the release -- an eBay seller is asking over $6,000 (!!!). I won't link to it from here -- this obscene display of consumerism doesn't deserve free traffic. Then I read multiple stories about how short the controller cables were. Given my entertainment system set up, it would force me to sit in the and awkward spot in order to play, certainly not comfortably on my couch.
Many companies responded to this shortcoming (see what I did there?) and offered cable extensions, but the fact remained that the NES Classic was out of stock everywhere, and there was no way I was going to pay the scalper price -- even the regular price of USD $59.99 ($79.99 for us Canucks!) was a bit steep given the limitations. So I got to thinking that maybe I could make my own, and maybe I could do it better.
So my goals were:
- A portable device on which I could play my favourite retro games
- Controllers that allowed me to play comfortably from my couch
- 4+ simultaneous players - I wanted this to be a nerd party machine!
- It had to have that "retro look."
- It needed to be immediately obvious to anyone that it's better than the NES Classic
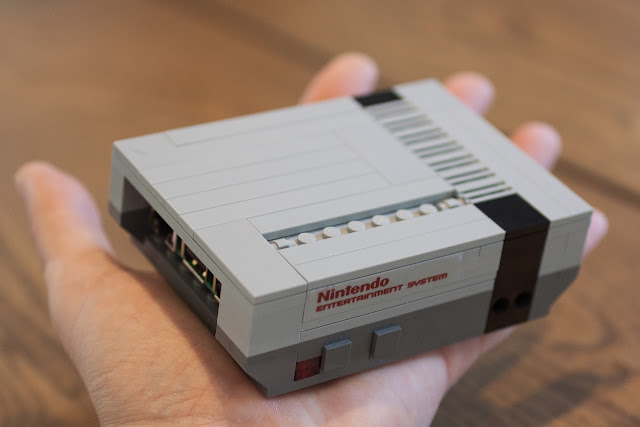
The full details follow, but here's the TL; DR photo:

 |
| Portable? Indeed! |
Still with me? Good! Read on.
The Guts

This is based on the RaspberryPi 3. I ordered Canakit's complete starter kitwhich has everything you need to get started except controllers. If you already have a microSD card and HDMI cable handy, then you can save yourself a few bucks and get this kit instead. In fact you can source your Raspberry Pi from wherever you want, but the real important thing here is the power supply. Make sure you get a good one, at least 2.5 amps. A Pi 2 will work as well, but expect it to perform a bit worse on some of the more demanding emulators, like Playstation and N64. Also, the Pi 3 has WiFi and Bluetooth built in, while with the Pi 2 you'll need USB dongles for these. If you're planning on using wired controllers, these dongles take up otherwise available USB ports. I'm guessing a USB hub could work, but that makes the whole setup a little less portable.
Controllers

I picked up 4NES30's from 8Bitdo. These are wireless (bluetooth), and so they satisfy my comfort requirements quite nicely. Plus they definitely have that "retro look"! These are fairly pricey, but they go an sale quite frequently on Amazon, and you can get even better deals on Ali Express if you don't mind the wait. The build quality on these is great, and battery life is phenomenal. I've yet to run one down during game play, and that's playing every day. I maybe get around to charging them once a week if I remember to do so. This controller looks like an original NES controller, but has the button layout of the Super NES. It works with everything retro, and any Playstation game that doesn't rely on the trigger buttons (i.e.: R2/L2). Otherwise, you can use pretty much any controllers you have. If you already have a bunch of old playstation controllers lying around, for example, or you can order some dirt cheap USB SNES clone controllers, too. Just remember you usually get what you pay for, and if you plan on playing a lot, then maybe the cheapest controllers won't last very long :).
Case

The enclosure is made of Lego. I looked at a bunch of 3D printed cases, but they all have that cheap 3D printed look to them, with the tell-tale streaks left behind by the process, and choice of rather unattractive colours. After much Googling, I came across theNesPi Lego case, and then eventually this clone, complete with the Lego Digital Designerplans. I tweaked the design a little bit to make the enclosure stronger, and to change the look of the "controller ports." I also wanted to make room for an eventual power led that I'll wire up behind the red transparent bricks. Ordering the needed bricks from Lego was a pain in the butt... you used to be able to order all of the bricks from Lego directly through LDD in one click, but that option is no longer available. So you instead need to use Lego's Pick-A-Brick service. You basically need to add all of the pieces to your order one at a time, and in some cases certain pieces aren't available for purchase. So you may need to order different pieces to substitute (e.g.: a 6x1 and a 4x1 plate instead of a single 10x1 because for some reason you can't order it in dark grey, even though I'm sure I could rummage through my kids' Lego and find it). It took me a good half an hour to put the order together, and since the order is hand-picked and shipped from the Lego factory in Poland, it took a couple of weeks to arrive. All-in, it cost a little under $20 shipped.
 |
| My tweaked Lego Raspberry Pi enclosure in Lego Digital Designer |
The one part that is NOT Lego is the Nintendo badge. The original NesPi design calls for a single red plate to represent the Nintendo badge, but I thought that ruined the effect. So instead I Googled for the NES badge and laser-printed it on clear adhesive label stock.
| Not a fan of the single red brick to serve as the NES badge. |
 |
| That's much better! |
Software

The whole things runs on an OpenSource project called RetroPie. RetroPie combines many (MANY!) game emulators together and presents them in a unified interface that can be navigated with a game controller. I'm currently using emulators for 80's arcade games, Atari 2600, NES, SNES, Sega, Sega Genesis, TurboGrafx 16, Playstation, and N64. N64 is about the limit of what you can expect from emulation on a Raspberry Pi. Some N64 games run surprisingly well -- MarioKart 64 and Super Mario 64 -- while others are downright unplayable -- Goldeneye (*sigh* I REALLY wanted this one to work...). Meanwhile, most everything else from the PS1 all the way down runs flawlessly, and only a few of the Playstation games experience some occasional slow down during 4-player gameplay, like Crash Team Racing.

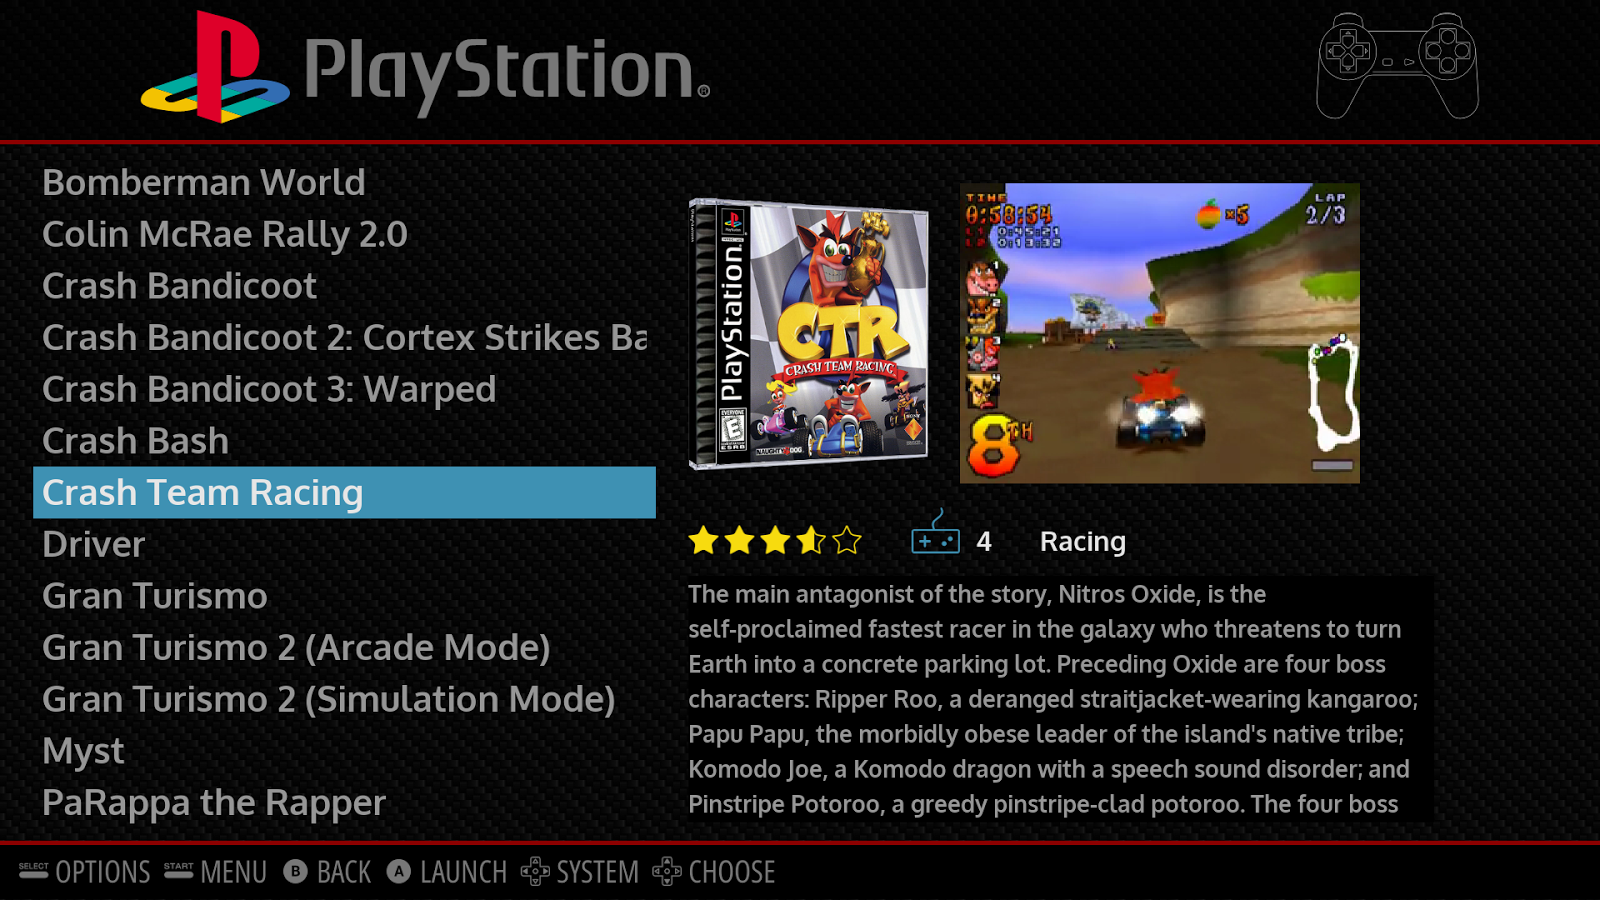 |
| My custom skin for RetroPie |
RetroPie's interface is customizable, so naturally, I made my own! It's really just a modification of the stock UI that comes with RetroPie, but I wanted to move things around a bit, and include video previews for all the games. I sourced video snaps and box art from EmuMovies, which has such a comprehensive collection of artwork and video files for pretty much every game system on the planet. For a small fee you can subscribe to their EmuSync service, which will automate scraping of game media for you.
Games
In order to play games you need to download ROMs. These are essentially copies of the original cartridges, arcade chips, game discs, etc. Most everywhere emulation itself is perfectly fine but possession of ROMs to run on an emulator is a legal grey area. Generally, the moral rule of thumb is that you shouldn't download a ROM unless you own the original game. I won't link to anywhere you can download ROMs... you're on your own here. But Google is your friend!
Final Thoughts
Ultimately I ended spending way more on this than if I had been able to buy an NES Classic at it's regular price. All in, I'm somewhere around $300. But if you already have old controllers lying around, and other bits you can salvage (microSD card, HDMI cable, etc), you could easily do this yourself for about the same price as an NES Classic. Even less if you happen to have a Raspberry Pi lying around that you didn't yet have any plans for. I'd also argue I'm having more fun with my build than I would have with the NES Classic. The most fun are the multi-player games. Super Bomberman 3 with 5 players is an absolute blast (heh another pun!), and 4-player Crash Team Racing is fantastic -- there are a bunch of us at work who play and it has become insanely competitive! Even my 6 and 9-year-old boys who are growing up with modern consoles (First a Wii and now a Wii U) love playing these old games with me. In my opinion 4-players crammed together on the same couch is way more fun that any online multiplayer game. And the games surprisingly look REALLY good on a modern HDTVs. The emulators have a lot of different ways the graphics can be tweaked to keep things sharp. SNES games in particular scale REALLY well. Yes they look blocky, but in that cool 8-bit retro way, not in that "wow.. this looks really old" way.
Given that this is an OpenSource project, you need to be willing to get your hands a little dirty, and expect to learn things along the way (making periodic backups of your SD card before and after significant changes was a lesson learned, for example...). Even thought the basics are easy -- the stadard install gets you up and running in very little time -- when you start tweaking things it can take some time to get things right. Initial configuration of the 8Bitdo controllers, for example, was a little tricky (this helped), and getting the right combination of old arcade games and emulators took a lot of trial and error. But for us tinkerers, that's all part of the fun, right? TheGoogle-fu is strong in me, and I was able to find solutions for everything.
At this point the little box has pretty much smashed all of the goals I had set out with! I've got some electronics parts on order, and when they arrive I'll be wiring up a power LED that shines behind the red transparent bricks (yep... I'll be learning to solder...), and a safe shut-down power switch that plugs into the analog audio jack. But otherwise, this project is just about finished.
For anyone who's interested in doing their first Raspberry Pi project, this is a great one to do. The basic installation of RetroPie isfully automated, which is enough to get you up and playing games in as little as about 30-minutes. And if you run into any snags, documentation is very good, and the folks in the RetroPie forum are super helpful for anything else you get stuck on.


Comments
Post a Comment